Contents
Introduction to MIG Welding
 MIG welding (also known as GMAW) is a really popular type of welding that’s frequently used for welding low-alloy steels and is well suited for welding autobody parts and home-repair projects. It’s a simple process to learn, which is why so many hobby welders use it as their preferred method of welding. This MIG welding guide will teach you everything you need to know to start MIG welding.
The MIG Process
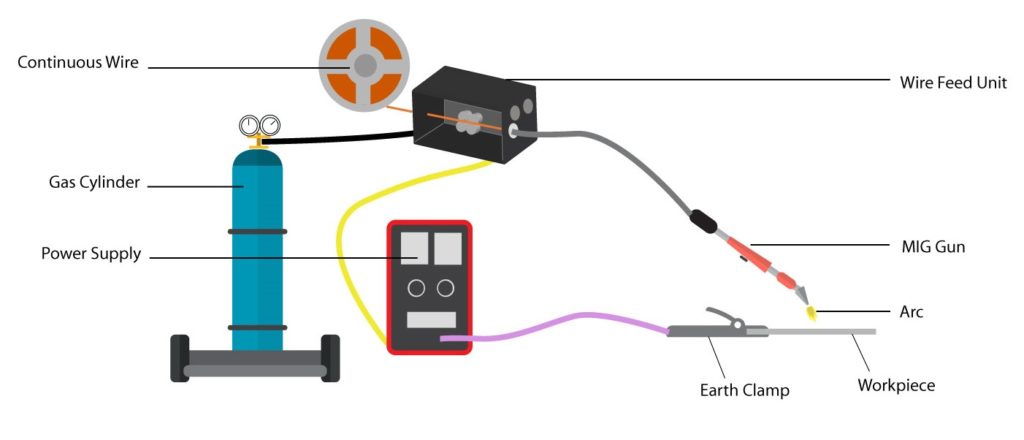
The MIG process is an arc welding process which joins metals together by heating them with an electric arc formed between a wire electrode and the workpiece. The wire electrode is fed through a MIG gun which is connected to a MIG welder and is consumed into the molten weld pool. A shielding gas is also released through the MIG gun to protect the arc and weld puddle from being contaminated by the atmosphere.
Benefits of MIG Welding
1. Productivity
One of the best things about MIG welding is the increased productivity and reduced clean up time. The time you save by not having to change rods, brush the weld or chip away slag can approximately double your productivity.
2. Reduced Costs
You can buy a high-quality welder for under $500, then you just need to spend a bit extra on some wire and gas and you can start welding. The increased productivity will also lower your welding costs and allow you to get more tasks completed, which is great if you’re running a small business.
3. Easy to Learn & Setup
The great thing about MIG welding is that anyone can learn how to do it. This is why it’s a good choice for home and hobby welders. Once you buy your MIG welder you can get set up to start welding in just a few minutes. In the sections below we’ve outlined all the information you need to get started with your welds.
4. Good Quality
MIG welding uses shielding gas to protect the arc from the atmosphere. This results in a good clean weld where you don’t have to remove any slag and being able to use both hands on the MIG gun helps with your control. Also, the wire feed and voltage settings allow for increased versatility.
How to Set Up to MIG Weld
Below is an illustration of how your complete MIG setup will look. Read the different sections to find out how to set up each component to get the best possible results.
MIG Wire
You’ll need to install MIG wire into your welding machine so that it can feed through the MIG gun and into the weld pool, this is pretty straightforward once you get the hang of it.
Wire Sizes
Usually, your welder will come with a roll of flux cored wire, so you will probably have to buy some MIG wire. When you’re MIG welding, you’ll want to choose thicker wire for thicker metal. Also, if you want the best quality welds, you’re better off cranking the machine up on a thinner wire than having it really low on a thicker wire. Below are guidelines for which wire to choose, but make sure you check the door chart on the inside or your MIG welder to see their specific recommendations.
- 0.23″ wire – This is only for your small welding machines when you’re welding thin sheet metal from 24 gauge to around 16 gauge.
- 0.3″ wire– This wire will often come included with your MIG welder, this is also a good choice for sheet metal up to around 1/8″.
- 0.35″ wire – This does the job up to 1/4″ so is a good choice for your beginner welders.
- 0.45″ wire – This wire is best for 1/4″ and above so is more suited for industrial welding.
Installing MIG wire
Once you have your MIG wire you will need to install it into your welder. Below are the steps you need to follow to successfully install your wire.
- Open up the cabinet.
- Make sure the cap is unscrewed from the spindle and slide the wire spool onto the spindle. Make sure the MIG wire faces in the direction of the drive roll and is on the bottom of the machine.
- Flick open the pressure release. If you press the trigger on the gun with this released, nothing will happen. You can also twist the pressure roll to adjust the tightness.
- Slowly feed the MIG wire through the drive roll entry making sure the wire is not bent.
- Put the cap on the spool of wire. Make sure the spring is in place before you attach the cap. Is you forget the spring the spool will keep rolling and damage the wire.
- Take off the MIG nozzle and contact tip with some pliers.
- Press the trigger to start feeding the wire through the gun.
- Put the nozzle and contact tip back on.
- Your MIG wire is set up!
Welding Gas
If you’re MIG welding you will need to use welding gas to protect the weld pool from the atmosphere. Below we have detailed why gas is so important and which gas is best for your specific welding requirements.
Porosity
Porosity is just another term for getting holes in your weld. This is something you really want to avoid because it makes the weld weak and not strong enough to hold the metal together.
Welding gas is essential in MIG welding to protect the weld pool from being contaminated by the gases in the atmosphere which causes porosity. If you don’t use gas, your weld will interact with the Oxygen and Nitrogen and become porous. This isn’t something you have to worry about when flux-cored welding, as the wire contains a core which shields the weld puddle.
When releasing gas from your cylinder you want to make sure that there is a good gas flow so that the weld bead is protected. However, if you release too much gas this will reduce the temperature of the weld pool. You need to find a balance between a high temperature and a good flow of gas. A good test for this is to place your hand 3 inches from the tip of the nozzle and release the gas. If you can just about feel the gas then you have a suitable gas flow.
Gas Types
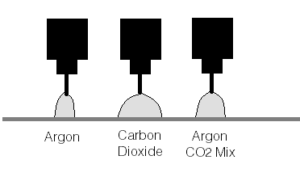
You can use different types of gas when MIG welding. The two most popular are Carbon Dioxide and a mixture or Carbon Dioxide and Argon.
1. Pure Argon
Pure Argon should not be used to weld steel and is only suited for non-ferrous metal such as aluminium. Argon has a “low thermal heat conductivity” which means it creates a narrow bead. This will give you decent penetration in the centre of the weld, but overall won’t provide enough penetration to effectively weld a steel joint.
2. Carbon Dioxide (CO2)
Carbon dioxide is popular for MIG welding and is the low-cost alternative to an Argon mix. The problem with CO2 is that it gives you a pretty wide arc that’s not stable and produces a lot of spatter.
3. Argon Mix
A mixture of argon and carbon dioxide is my preference for MIG welding because it produces the highest quality of weld. When you mix these gases together, you get a much more suitably sized arc stream which gives great penetration and minimizes spatter.
See more about MIG welding gas.
Gas Safety
You have to be really careful when handling a gas cylinder and make sure you read all the safety information that comes with the cylinder. Gas cylinders are seriously high pressure, and if it falls over and knocks the regulator off it will fly across the room.
When you’re opening the cylinder to release gas, don’t stand on the same side as the regulator, in case it flies off. Also, make sure you open the valve slowly and carefully; if you suddenly yank it open this could release too much pressure in one moment and it could fly off. When you set up your cylinder, make sure it’s firmly tied to something to keep it in place. Welding safety is really important, so make sure you follow all the guidelines on your equipment and familiarize yourself with the welding safety basics.
Nozzle & Electrode Stickout
When you’ve fed the wire into the MIG gun, the shorter the electrode stickout, the hotter the weld will be. For the optimum setup, the electrode should stick out no more than 3/8″ from the nozzle and the minimum you should have it is 1/4″. If you’re welding really thin metal you could have it longer than 3/8″ if you’re concerned with welding straight through the metal.
You should also make sure that you keep the nozzle clean and remove any spatter that sticks to it. If your nozzle has spatter stuck to it, this can reduce the flow of gas to the weld puddle and cause porosity. To prevent spatter sticking to your nozzle there is a range of sprays and gels you can apply to your nozzle to stop it sticking.
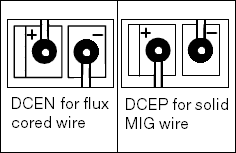
Polarity
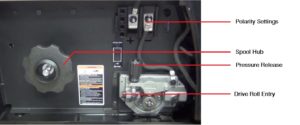
When MIG welding you need to have the MIG welder on the right polarity. For MIG welding this is direct current electrode positive (DCEP). Any MIG/Flux-cored welder will either run on direct current electrode negative, or direct current electrode positive. If you’re welding flux-cored, you will need to change the terminal to negative. This is pretty straightforward to do, although it is different on different welders so make sure you check the instruction manual. Usually, you will need to open the door of the MIG welder and switch over the polarity settings in the top right corner of the machine.
Front of Machine
Usually, the front of your MIG welder will have a simple layout and there will be two main dials which control the wire feed speed and the voltage settings.
Voltage
The voltage settings determine the temperature and the height and width of the bead. For the thinnest metals, you will start on the lowest voltage setting and move up depending on the thickness of the metal.
Wire feed speed
The wire feed speed will increase as the voltage settings increase. You’ll know when the wire speed is set correctly as it makes a sound like you’re frying bacon.
MIG Welding Techniques
Now you’ve got your machine fully set up you’re ready to start MIG welding. When welding there are so many different variables; the position of the joint, the type of joint, the movement of the MIG gun, the thickness of the metal, gravity also plays a part. Below we’ve written guides to cover all the common MIG welding techniques.
Torch Movements
MIG welding isn’t just simply pushing across in a straight line, there are different types of movement suited to the type of joint and metal being welded. Clean the metal.
Forehand/Pushing
The most common welding position is a push weld in the forehand position. To get into the correct position you need to hold the MIG gun at a 10° angle with the electrode pointing in the direction you’re looking to weld. You can decrease the angle and this will change the shape of the weld bead as show in the diagrams below.
Once you’re in position you need to press the trigger and slowly move the MIG gun, pushing forward in the direction of the weld. One of the positives of this position is that you have a clear view of the weld joint. When doing this you need to make sure the electrode is pointing forward at the leading edge of the weld.
Backhand/Pulling
When you pull the weld you use a backhand position and move the electrode backwards towards your body. Again you use the same 10° angle and keep the electrode on the edge of the weld puddle. One of the positives of this is that you tend to get more penetration than when you’re pushing as the weld bead builds up. You’ll find times where you need to use both pushing and pulling, but I feel that there’s more chance of contaminating the weld when pulling so I tend to use the push technique whenever possible.
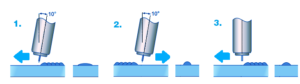
Figure 1. Push Weld
Figure 2. Pull Weld
Figure 3. Push Weld with narrow bead
Types of Bead
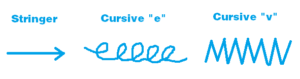
Stringer Bead
A stringer bead is the most straightforward weld, where you simply push or pull the MIG gun across a joint in a straight line. These are usually thinner welds than weave beads but are fine for your average butt weld.
Cursive “e”
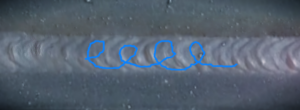
The cursive “e” weld is a popular weave bead. To perform this, weld straight across the joint but use small circles which are linked together to form e shapes. This gives a really cool scaled effect and can look very smooth. This is a good choice for thick metal where you can overlap the weld bead to increase the weld deposit.
Cursive “v”
Similar to the cursive “e”, but this time you move the electrode side to side in a “v” shape which forms a zigzag shape. This is often used for overhead and vertical welds where you don’t want the weld bead to drip down so you have to angle it upwards.
Welding Positions
Flat Position
The flat position is the easiest position to lay your weld. In this position, your metal will lay flat on the table and you will usually approach the weld horizontally and above the joint.
Horizontal
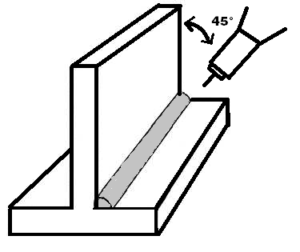 Often welds will need to be done horizontally. In a horizontal weld, the weld is performed across a horizontal surface that crosses a vertical piece of metal. This is usually used for fillet and groove welds.
One of the main problems when performing a horizontal weld is that the weld bead can sag down, so you need to try and push the weld up so that you get a nice even weld. To do this, I place the nozzle at around a 45° angle to the joint and direct the electrode forward at about a 10° angle. Then I use the cursive “e” shape in the forehand position to push the weld up.
Vertical
 A vertical weld is when the weld’s axis is vertical or over a 45° incline. This is regularly used in structural welding and takes more skill than horizontal welding because you’re fighting more against gravity.
This is called either “vertical up” or “vertical down” depending on whether you’re welding from the top to the bottom of the joint or from the bottom to the top. For both these types of movement, I like to oscillate the MIG gun in a “u” shape and keep the gun pointing upwards at around 10° from the horizontal.
When performing a vertical down weld, you should keep the electrode pointing upwards but slowly bring the electrode down the joint. This is a more suitable choice for welding thinner metals because you’re not preheating the plate so you’re less likely to burn through the metal.
For a vertical up weld, hold the MIG gun at the same angle but slowly push it up the joint. This is better if you’re welding thick metal because the heat from the gun preheats the metal above it for increased penetration.
Overhead
 The final and hardest welding position is the overhead position. Here you are welding a joint that is usually horizontal but you are approaching it from the underside. This can put you in quite an awkward position and is also dangerous because of all the sparks that will be falling on you.
The first thing to do before an overhead weld is to make sure your body and head are fully covered. There will be sparks everywhere and you need to take every possible precaution so that you don’t burn yourself.
When performing the weld you’re best to use either the cursive “e” or “v” motion to stop the weld bead dripping down. You should also maintain a short arc, keep it on low amperage if possible, and move fast! Keeping the nozzle as close as possible to the workpiece will help prevent the puddle from dripping on you.
Types of Welding Joint
There is a huge range of different welding joints and combination joints that can be performed. Below are the four most common joints which are the fundamentals for all welders. If you learn these you’ll be in a great position to perform almost any home welding task.
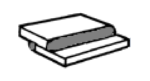
Butt Joint
 A butt joint is one of the most common and simplest types of joints to learn. A butt joint consists of two pieces metal which are parallel to each other with the ends together. Once the edges of the metal are together you simply weld right down the seam.
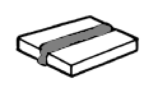
Lap Joint
 A lap joint (also known as fillet joint) is formed when two pieces of metal overlap and you weld them together. You can either perform a single or a double lap joint. Often a single lap joint will do the job, but if you’re building something structural that’s going to put under a lot of pressure then you’ll want to weld on both sides to make sure it’s strong enough.
When welding a lap joint, you will find that it’s harder to get good penetration on the bottom of the weld. This is because heat rises and is lost quicker at the bottom of the weld. To counter this, make sure you aim your Mig gun towards the bottom piece of metal when performing a lap weld. You can also try welding in an ‘e’ or horseshoe motion.
T Joint
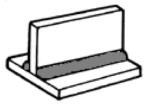 A T Joint is formed when two pieces of metal intersect at a right angle to form a T shape. This is another type of fillet weld. If you weld it straight across you’ll see that the force of gravity pulls the weld bead down, so you should use a horseshoe or ‘e’ type motion to help push the bead up when moving across the joint. If you want a really high-quality weld you should hold the Mig gun slightly longer at the top of the ‘e’ and move it down and up quickly. When looking at the finished weld side on, the join shouldn’t be too concave or convex, it should be flat.
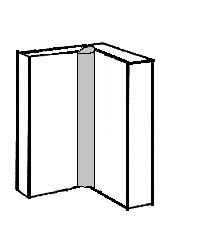
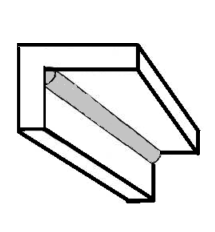
Corner Joints
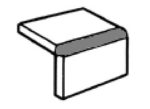 A corner joint is another very common weld which is formed when two pieces of metal meet at a right angle to form a letter L. Corner joints can be pretty tricky when you get below 1/8″ thick metal as the metal wants to melt away. The image shows an outside welded corner joint, but you can also have a double welded corner joint for extra stability.
Metal Thickness
Depending on the thickness of the metal you’re welding, you may need to bevel the edge of the metal with a grinder to help you achieve a strong weld. When making a bevel, you should grind a small 30° gap into the edge of the metal. This means that when you press the two pieces of metal next to each other, you’ll have a nice groove where you can create the weld pool. You can choose to weld just one of the plates of metal on one side, up to both plates on both sides.
Low Thickness
For your low thickness welds of around 1/8″ and under, you won’t need to worry about bevelling the joint. Usually, I keep the electrode close to the joint when I’m welding to make sure I get good penetration, but you can keep it a little further away on thin metal where you’re at risk of burning straight through it.
Medium Thickness
When working on a standard butt weld, if the metal you’re working on gets over 1/8″ thick, you’ll be better off bevelling the edge of one of the pieces of metal. This will enable you to get the weld bead right down between the two metal plates and make your weld a lot stronger than having a flat edge butt weld.
High Thickness
For even thicker pieces of metal, you can bevel both sides of the plate. This won’t be applicable to hobby welders with 140A welding machines, but if you’re a professional industrial welder this is a way of producing even stronger quality welds.
Most of the people reading this will be beginner welders and won’t be welding really thick steel, but I’ve written about it so that you have an idea for the future if you decide to move on to thicker metals.
To perform this it’s exactly the same as the medium thickness welds, you just flip it over and do exactly the same on the other side once you’re finished.
When you’re welding on thick metal, sometimes you’ll need to run a few passes before the joint is secure. If you’re doing this, make sure isn’t any slag on the weld before moving on to the next pass. If there’s any slag it will just weaken your weld.
Below there is a guideline table for the recommended type of joint for different thicknesses of metal.
| Joint type | Thickness | Diagram |
|---|---|---|
| Square joint | Up to 1⁄4 in | |
| Single-bevel joint | 3⁄16–3⁄8 in | |
| Double-bevel joint | Over 3⁄8 in | |
| Single-V joint | Up to 3⁄4 in | |
| Double-V joint | Over 3⁄4 in |
Conclusion
MIG welding is the best way for beginners to start welding and hopefully this guide’s given you everything you need to know to get started on your welds.
If you have any questions, don’t hesitate to leave a comment or send me an email. If you liked this article – please share it by clicking one of the buttons below!
This site is absolutely fabulous!
Keep up the great work guyz.
This is AMAZING! Thanks for all the tips guys
Your blog is very interactive and knowledgeable. I like it so much. I think I need to subscribe it and make the most use of it by reading it regularly and keeping myself updated.
The guide is great but note that the MIG wire sizes are all out by 10X (e.g. should be 0.045″ not 0.45″). 1mm is much easier.
Easy to understand terminology/graphics.
Great Job.
Thanks a lot guys. im in high school welding and i was confused. this helped a !lot