This page serves as a point of reference and a guide for selecting the right stick welding rod size and amperage to get the best results when stick welding. These guidelines can vary between different manufacturers so always check the manufacturer’s guidelines if possible.
Contents
How to choose the right welding rod size
The primary factor when choosing the size of a welding rod is the thickness of the base metal that’s going to be welded.
The welding rod should be thinner than the base metal, but not thinner than half of the base metal. The thicker the base metal, the larger the welding rod diameter and the amperage.
The larger the rod in relation to the thickness of the metal will cause a higher deposition rate and faster welding.
If you select a welding rod with the same diameter as the metal thickness, this can cause too much heat and result in warping and blow-through.
If the welding rod diameter is less than half the thickness of the metal, it can result in slag inclusion and inadequate penetration. Ideally, you want an electrode one that’s just smaller than the joint.
When welding vertical or overhead, you should choose a smaller welding rod diameter which provides less deposition and an easier to control weld pool.
What are common stick welding rod sizes
The most popular welding rods for hobbyists are 3/32” rods. 1/8” and 5/32” are also very common.
Larger diameter welding rods are only really needed for welding 1/2” and above, so won’t be used on your average home welding project. The required amperage to use these electrodes might also be too high because many portable stick welders only go up to 160A.
Smaller diameter welding rods are hard to run and not regularly used because stick welding produces a lot of heat and it’s easy to burn through thin metal.
If you aren’t sure which type of electrode to buy then look at our comparison of 6010 vs 6011 vs 6013 vs 7018 vs 7024.
How to choose welding rod amperage
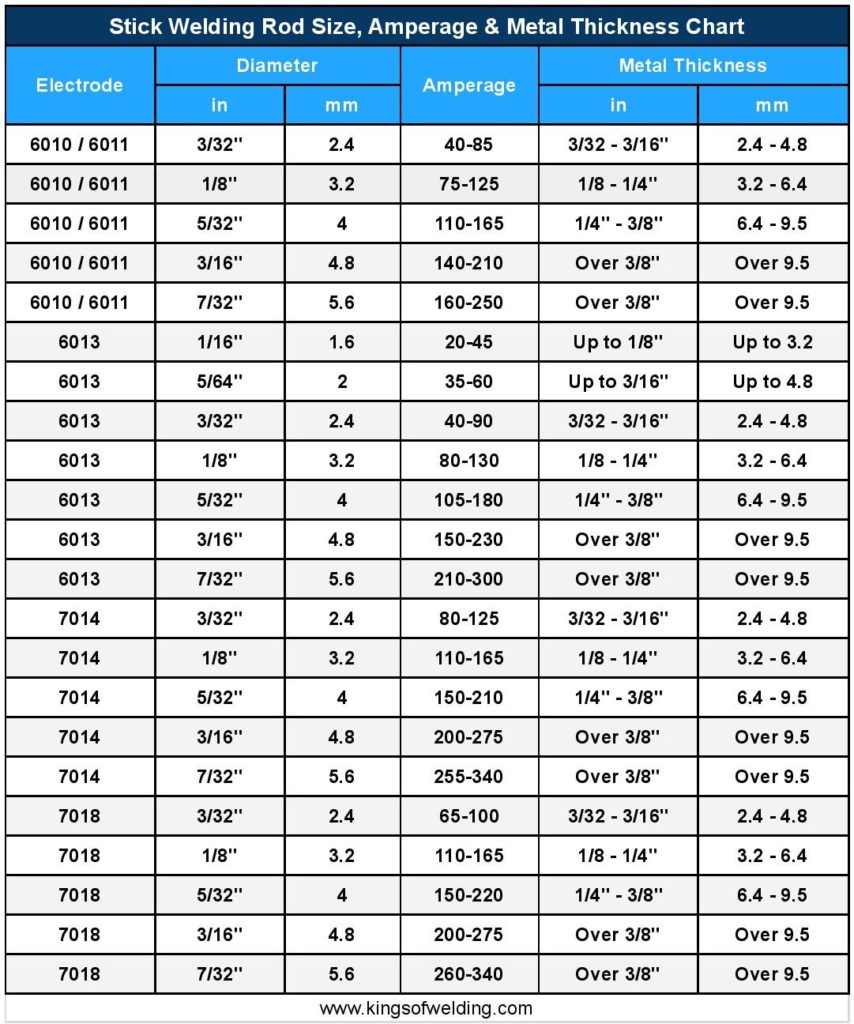
Once you’ve chosen your welding rod diameter, use the stick welding rod chart at the top of the page to find the amperage range for that specific electrode.
The amperage that you choose from the range will come down to a few different factors, but you should use a high amperage on thicker metal and low amperage on thinner metal. You will need to set the amperage high enough to give the best possible penetration without weld defects.
You will notice that the amperage is not the same for each type of welding rod of a certain diameter. That is because the flux coatings on different welding rods react differently under different currents.
A good starting point for setting your amperage is to choose an amperage in the exact middle of the range for a horizontal fillet weld. For example, a 1/8″ 6011 rod would be 100A at its middle amperage. Welding around this amperage should give good fusion, no sticking and not too much heat. Then from this point you can adjust based on the following variables.
Base Metal
- For thinner base metal use lower amperage
- Thicker base metal use higher amperage
Welding position
- Overhead position you should lower the amperage by 5% (and a thinner electrode)
- Vertical-up position you should lower the amperage by 10% (and a thinner electrode)
- Vertical-down position you should increase the amperage by 10%
Joint Type
- Decrease the amperage by 10% for butt welds.
- Decrease the amperage by 15% for corner joints
Current
- Increase the amperage by 10% when welding AC
Temperature
- Decrease the amperage if the base metal is hot
- Increase the amperage if the base metal is cold
Troubleshooting welding amperage
Setting the wrong amperage can cause weld defects and trouble starting the arc. If you’re not getting the results you want but aren’t sure if you’ve set the amperage too low or too high then look out for these indicators.
Different manufacturers can have slightly different amperage ranges, so make sure to check the packaging and follow their guidance. .
When the amperage is too low
- It’s harder to start the arc
- The arc is weak
- The welding rod sticks
- The weld puddle is too thin
- There is low deposition
- Travel speed is low
- There is low fusion
- The slag is darker than usual
When the amperage is too high
- The arc is violent
- The deposition is too high
- The travel speed is too fast
- The weld bead is too wide
- There’s warping or burn-through
- There’s a lot of spatter
- The welding rod may turn red
- The slag is redder than usual